Before scanning, use the Scanning Configuration window to specify where scanned images are stored, as well as other important settings.
- Click the Scanning menu and select Scanning Configuration. The Scanning Configuration window opens.
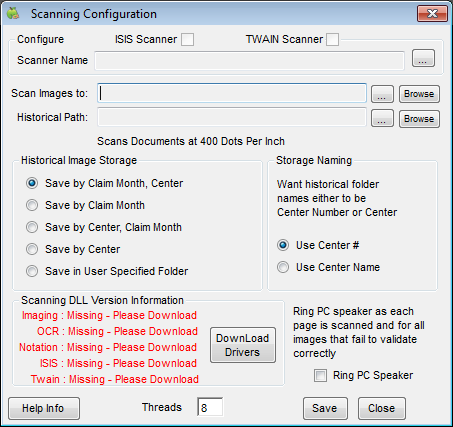
- Make sure that the ISIS Scanner and TWAIN Scanner boxes are clear.
- Click
 next to Scan Images To and select the folder in which you will save scanned images. Minute Menu CX will look in this folder for images to scan. You can configure your scanner to automatically save images in this folder, or you can move them to this folder once scanned.
 - Click
 next to Historical Path and select a folder in which images will be moved after they are scanned by Minute Menu CX. We strongly recommend that you create backups of this folder often.
 - In the Historical Image Storage section, specify how to organize historical folders. For example, if you select the Save by Claim Month option, the folders are organized by claim month.
- In the Storage Naming section, specify the naming convention to use for historical folders. You can select Use Center # or Use Center Name.
- Click Save.
- If you are missing required drivers, click Download Drivers. Missing drivers are listed to the left of this option in the Scanning DLL Version Information section.

 next to Scan Images To and select the folder in which you will save scanned images. Minute Menu CX will look in this folder for images to scan. You can configure your scanner to automatically save images in this folder, or you can move them to this folder once scanned.
 next to Historical Path and select a folder in which images will be moved after they are scanned by Minute Menu CX. We strongly recommend that you create backups of this folder often.