Setting Up the Export
To set up the QuickBooks export:
- Click the Administration menu and select Manage Policies.
- Click + next to P. Center Payments.
- Click + next to Policies P.2a - P.2e and enter your QuickBooks account information. Ensure that the account names in QuickBooks match center names in CX exactly. Names that don't match exactly could cause errors during the importing process. Extra spaces or punctuation can cause issues.
- When finished, click Save.
Creating the Export File
- Click the Payments menu and select Issue Payments. The Issue Payments window opens.
- In the Payment Method section, select Checks or Direct Deposit.
- Check the box next to each claim month to pay.
- Click Calculate.
- Verify that the total dollar amount of selected payments is correct.
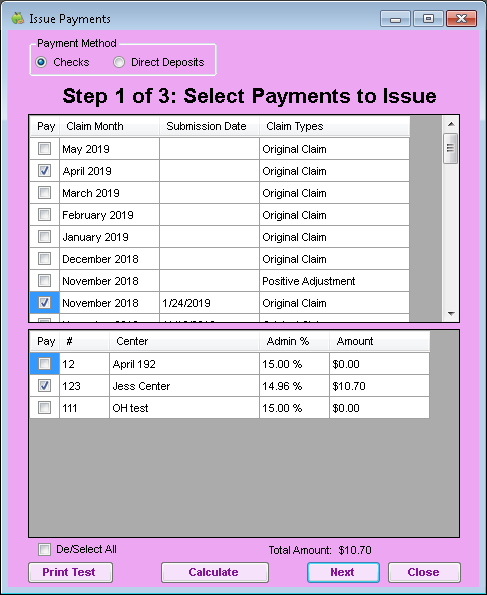
- Click Next. Step 2 opens.
- Click the First Check Number box and enter the starting check/payment voucher number.
- Click the Payment Date box and select the payment date.
- In the Print Order section, select Center Name or Center Number.
- In the Print Destination section, select Export File or Both (if you are also printing checks/direct deposit vouchers).
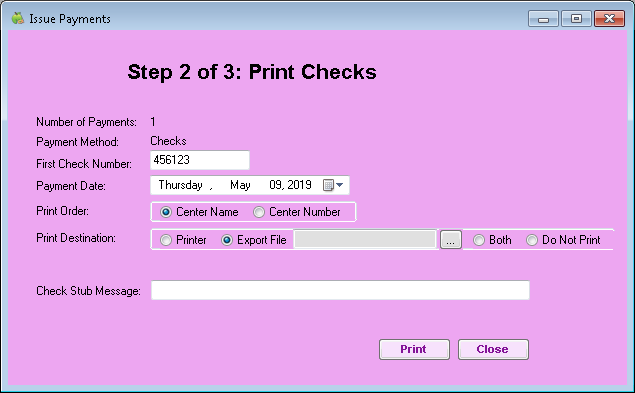
- Click Browse and choose the location in which to save the export file.
- Click Print.


Note: Even if you are not printing checks/direct deposit vouchers, you must click Print to create the export file.
Exporting Previously Created Payments
If you have run Issue Payments for a group of payments and wish to import them into QuickBooks, you can create an export file without running Issue Payments again. To do so:
- Click the Payments menu and select QuickBooks Export. The QuickBooks Export window opens.
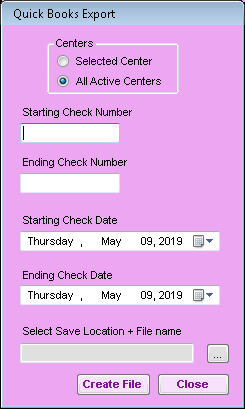
- In the Centers section, select All Active Centers or Selected Center.
- Click the Starting Check Number and Ending Check Number boxes and enter starting and ending check numbers.
- Click the Starting Check Date and Ending Check Date boxes and enter the starting and ending check dates.
- Click
 and select the location in which to store the file.
 - Click Create File.

 and select the location in which to store the file.
Import the File into QuickBooks
- Open QuickBooks.
- Click the File menu, select Utilities, Import, and select IIF File.
- Browse to the location in which you saved the Minute Menu Export File.
- Click Open. The payment information imports into QuickBooks.