After claims are processed and reprocessed as needed, and the claims are ready to be submitted, you can use either an upload file (only available in some states) or access claim reports that will help you enter the data into your state website.
Note: Minute Menu CX does not relay information directly to your state agency. An upload file may be available in some states. However, you must still generate the file in Minute Menu CX, save it, and then upload it to your state agency website (if available). Even when you use an upload file, you must still mark your claim as submitted in Minute Menu CX.
Generating State Upload Files & Claim Reports
To access the upload file and/or to view claim reports:
- Click the Claims menu and select Submit Claims to State. The Submit Claim to State dialog box opens.
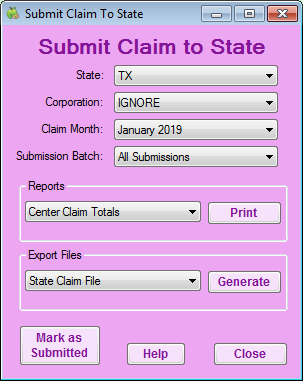
- Ensure that the correct claim month is selected.
- Click the Reports drop-down menu and select the report to print. Use the report that works best for you. The most commonly used reports are the Center Claim Totals report and the State Summary report.
- Click Print.
- If an upload file exists in your state, State Claim File displays in the Export Files section.
- If you do not see this option, an upload file does not currently exist in your state.
- If you do see this option and this is your first time generating an upload file, contact Minute Menu CX support, as some setup is required before you can successfully upload your claim.
- If you have already completed the initial setup, click Generate, and select the location in which to save the file. Do not change the name of the file.
- If you generated an upload file, log in to your state agency's website and upload it.

Marking Claims as Submitted
When you have filed a claim or are about to file a claim with your state agency, mark the claim as submitted in Minute Menu CX. When you mark claims as submitted, all processed claims are bundled together in a submission batch with the current date. If you later need to adjust any of these claims, or if any claims come in late, those claims are kept in a separate submission batch. This way, you can easily separate your original claim from any amended claims submitted to the state agency. This is helpful for audits.
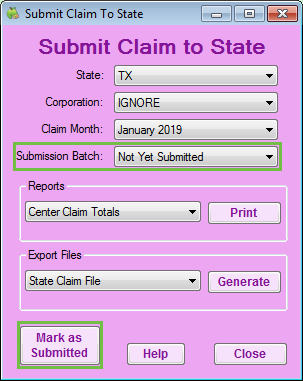
To mark claims as submitted:
- Click the Claims menu and select Submit Claims to State.
- Ensure that the correct claim month is selected.
- Click the Submission Batch drop-down menu and select Not Yet Submitted.
- Click Mark as Submitted.

Once you mark a claim as submitted, all claim records associated with the claim are locked. Any changes made to the claim after you mark it as submitted are considered adjustments. You can filter reports printed from the Submit Claim to State dialog box by submission batch or submission status. If you have multiple submissions to the state, mark each batch as submitted in Minute Menu CX immediately before or after you submit it to the state.
Viewing Claim Submission Status
You can view which claims have been submitted to the state in the List Claims window.
- Click the Claims menu and select List Claims. The List Claims window opens. Claim submission status is listed in the Submitted column:
- Yes: The claim has been marked as submitted.
- No: The claim has been processed, but has not been marked as submitted.
- Partially: An adjustment was made to the claim after it was submitted to the state.
