You, the sponsor, and centers can both enroll children. Centers can also import children from another program, such as Procare. When centers enroll children, those children are automatically set to Pending, You must review and activate these children. For more information, see Activate Children.
IMPORTANT! Check with your center to see if they have Procare before you enroll children. Do not enroll children if your center is planning to import from Procare, as this can result in duplicate records. For more information, see Procare Import.
- Click the Select Center drop-down menu at the top of the window and select the center for which to enroll children.
- Click Enroll Child from the toolbar at the top of the window. The Enroll New Child window opens.
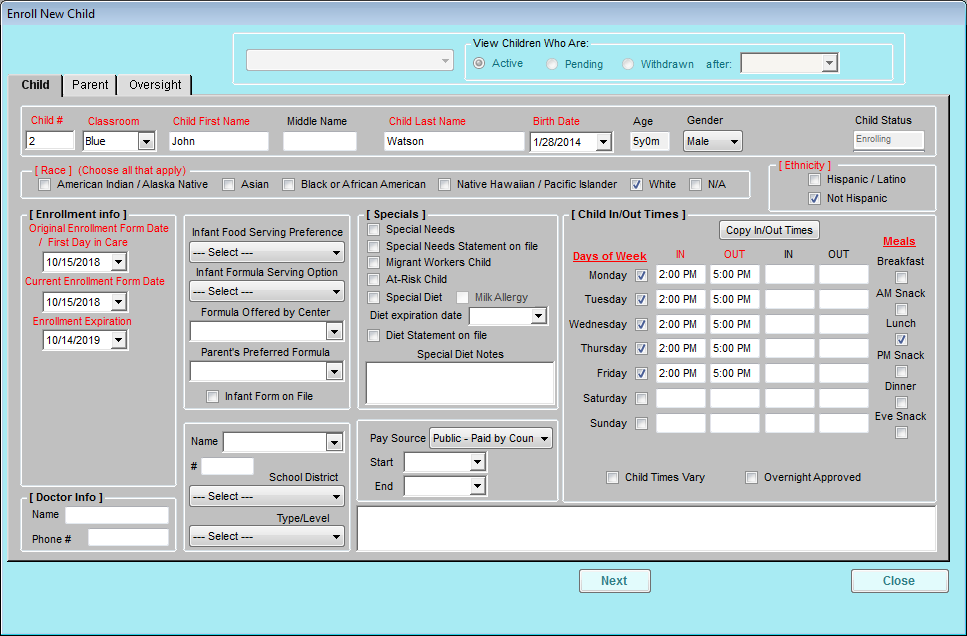
- In the Child tab:
- Click the Child # box and enter a child number, or accept the system-generated number. You can enter up to four characters in this box.
- Click the Classroom drop-down menu and select the classroom to which to assign this child. You can also enter a new classroom name.
- Click the Child First Name and Child Last Name boxes and enter the child's first and last name.
- Click the Birth Date drop-down menu and select the child's birth date. The Age box updates automatically.
- In the Race section, check the box next to each option that applies.
- In the Ethnicity section, check the Hispanic/Latino box or the Not Hispanic box.
- In the Enrollment Info section, click each drop-down menu to set the child's enrollment dates and enrollment expiration date.
- In the Child In/Out Times section, check the box next to each day of the week the child is present in daycare. Then, click the In and Out boxes and enter the child's usual in and out times.Note: If the child's In/Out times are the same for all selected days, enter the first In/Out times, and then click Copy In/Out Times to copy the times to the remaining selected days.
- Check the box next to each meal in which this child participates.
- Complete the remaining fields, as needed.
- Click Next. The Parent tab opens.
- In the Parent tab:
- Click the Select Parent drop-down menu and select an existing parent, or select Add New Parent. If you select an existing parent, go to Step 6.
- If you are adding a new parent/guardian, click the Primary Contact drop-down menu and select Mother, Father, or Alternate.
- Click the Home Phone box and enter a good phone number for the parent/guardian.
- Click the Address, City, and State boxes and enter the parent/guardian's address information.
- Click the Name boxes in the Mother Info, Father Info, or Alternate Contact Info section and enter the parent/guardian's first and last name. The required box depends on your selection in Step 5.b.
- Complete the remaining fields, as needed.
- Click Next. The Oversight tab opens.
- In the Oversight tab:
- Click the Reimbursement Level drop-down menu and select the child's reimbursement level according to their income eligibility form. You can also use the income eligibility calculator at the bottom of this tab to calculate the child's reimbursement level. For more information, see Income Eligibility Calculator.
- Complete the remaining fields, as needed.
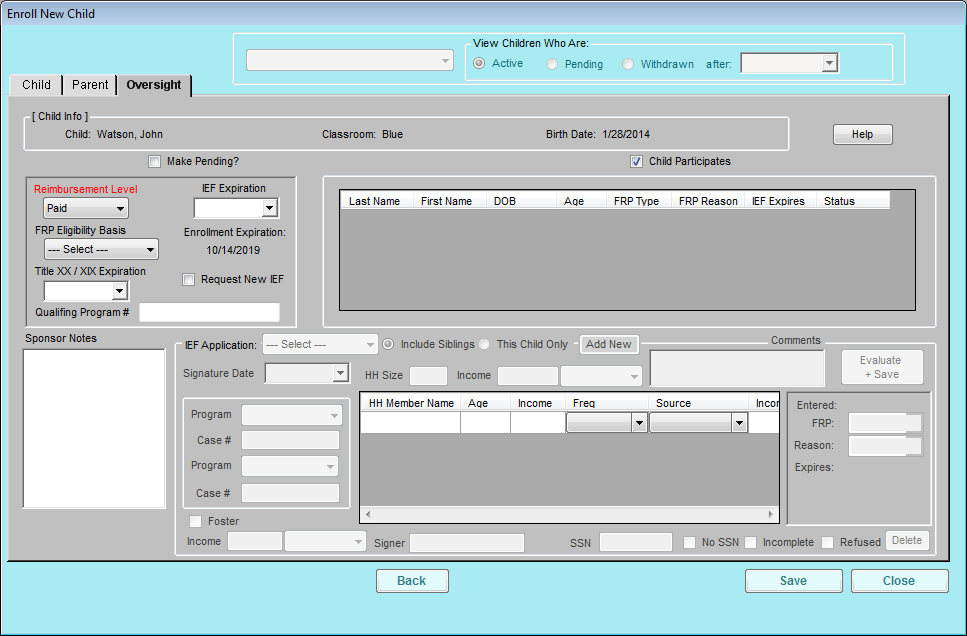 Note: Children are made active automatically unless you check the Make Pending box in the Oversight tab.
- When finished, click Save.


For more information about the fields in each tab of the Child Information window, see Understand Child Information.