The Non-Claim Payments Adjustment feature allows sponsors to make positive and negative adjustments to center payments using a specific dollar amount. This feature should not be used for claim adjustments (where an individual claim is adjusted). For example, you would use this feature if you pay for catering for your centers and want to deduct a specific dollar amount from their payment.
If you use Issue Payments in Minute Menu CX, any non-claim payment adjustments you make are automatically included on the original claim.
Creating a Non-Claim Payment Adjustment
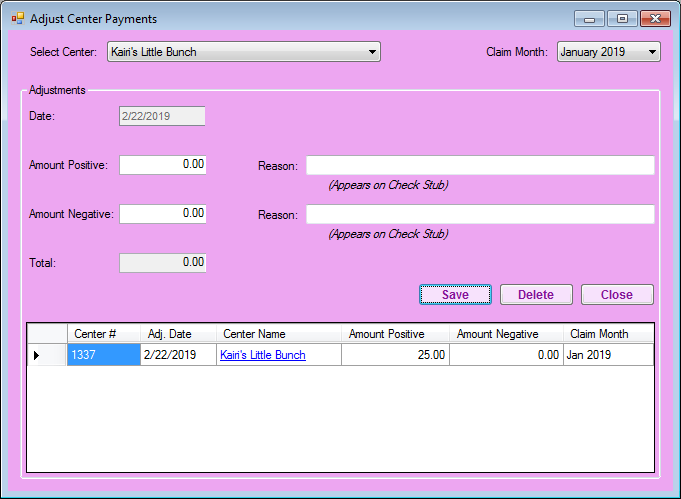
- Click the Payments menu and select Adjust Non Claim Center Payments. The Adjust Center Payments window opens.
- Click the Claim Month drop-down menu and select the month to which you need to make an adjustment.
- Click the Select Center drop-down menu and select a center. Only those centers with a claim for the selected month display in this menu.
- Enter the dollar amount adjustments.
- Enter a dollar amount in the Amount Positive box to add money to the center's check.
- Enter a dollar amount in the Amount Negative box to deduct money from the center's check.
- Click the Reason box next to Amount Positive and/or Amount Negative and enter a specific reason for the adjustment. This reason prints on the check/direct deposit stub.
- Click Save. A row is added to the bottom of the window and displays the adjustment you added.

Changing Non-Claim Payment Adjustments
- Click the Payments menu and select Adjust Non Claim Center Payments. The Adjust Center Payments window opens.
- Click the Claim Month drop-down menu and select the month to which you need to make an adjustment.
- Click the Select Center drop-down menu and select a center. Only those centers with a claim for the selected month display in this menu. A list of adjustments for the selected center/month display in the bottom of the window.
- Click the link in the Center Name column. The adjustment amount(s) and reason(s) display in the top portion of the window.
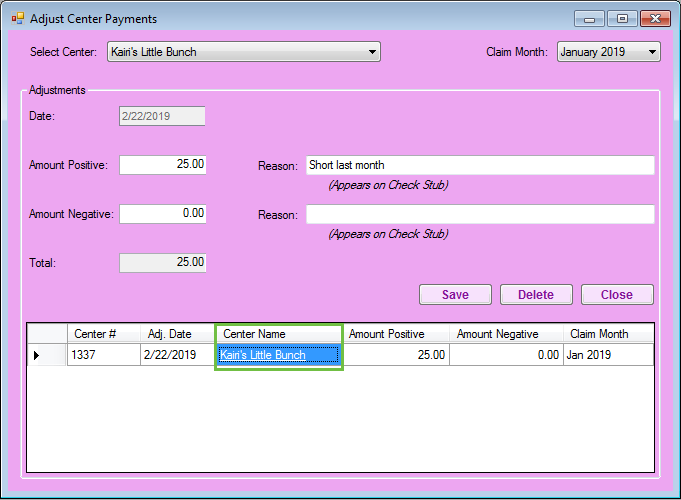
- Update the adjustments, as needed.
- Click Save.

Printing the Non-Claim Payment Adjustment Report
To view a report of all Non-Claim Payment Adjustments within a selected date range:
- Click the Reports menu, select Payments, and click Non Claim Payment Adjustments. The Date Range/Export Options dialog box opens.
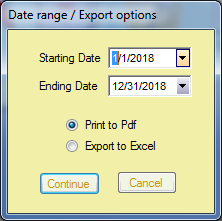
- Click the Starting Date box and select the beginning of the date range.
- Click the Ending Date box and select the end of the date range.
- Select Print to PDF or Export to Excel.
- Click Continue.
- Select Selected Center or All Centers.
- Click Run Report. The report is generated in the format you selected in Step 4.
