- Click the Select Center drop-down menu and select the center to review.
- Click the Tools menu and select List Reviews. The List Reviews window opens.
- Click Add. The Add a New Review window opens to the General tab by default.
- In the General tab:
- Click the Date box and select the review date. This box defaults to today's date. The date you set here also sets the date in the Next Review box. The next review date is set for four months from the current review date, unless you indicate that a follow-up visit is required. If a follow-up visit is required, the date in the Next Review box is set for two weeks from the current review date.
- Click the Type drop-down menu and select the type of review you are conducting. For example, if this is the first time you are reviewing this center, you would select 1st Review.
- Check any of the following boxes that apply to this review:
- Followup Required
- Unnaounced
- 3 Year Detailed Review
- Attempted Review
- Desk Review
- Click the Notes for Next Review box and enter any notes for the next scheduled review.
- Click the Monitor drop-down menu and select the monitor who completed the review.
- Click the Monitor Arrival Time and Monitor Departure Time boxes and enter the time the monitor arrived at the center and the time they departed from the center.
- In the Block Claim section, indicate whether this was a review for block claims.
- In the Training section, check the box next to each item that applies.
- Click the Eval Grade box and enter the review grade.
- Click the Review Comments box and enter any comments about this review.

- Click the Meal tab.
- In the Meals tab:
- Record attendance by classroom, age group, or center total. The method you use is subject to Policy R.4Note: You can skip entering counts in the table and enter totals directly below the table if totals are all you need. The total served count will be compared to the meal counts recorded by the center for that meal on that day (subject to Policy R.2).
- Click the Reviewed Meal drop-down menu and select the meal that was reviewed. If you did not review a meal, select No Meal. If you select no meal, go to Step 7.
- Click
 next to each meal component and record the foods that were served for each age group. CX can cross-check the foods the monitor enters with the foods the center recorded (subject to Policy R.3).
 - In the Milk Inventory On Hand section, check the Pre-Serving or Post Serving box. Then, enter the milk totals accordingly.
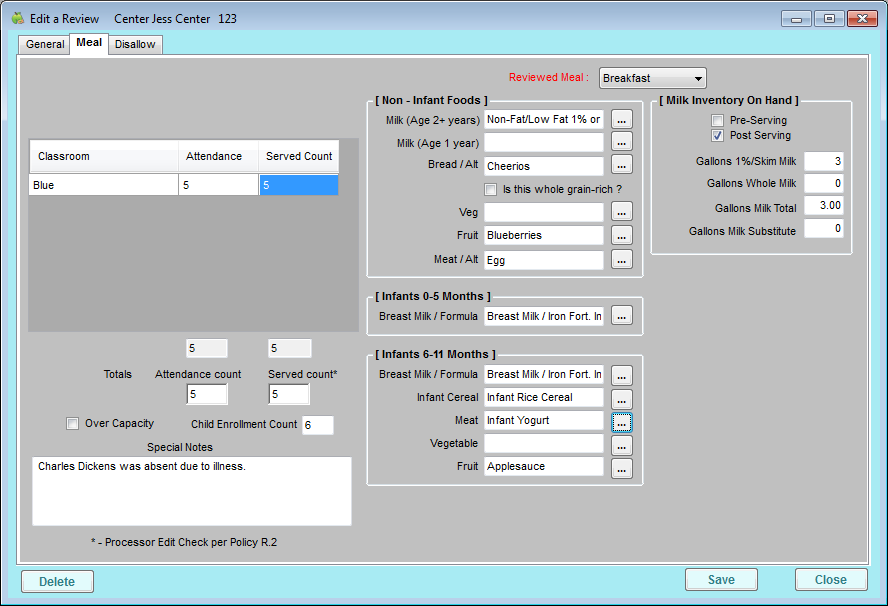
- Record attendance by classroom, age group, or center total. The method you use is subject to Policy R.4
- If you have disallowances, click the Disallow tab. If you do not have disallowances, go to Step 9.Note: Only use the Disallow tab if meals need to be disallowed as a result of the monitor visit.
- In the Disallow tab, you can:
- Disallow a range of meals:
- In the Disallow a Range of Meals section, set starting and ending dates to disallow. For example, you could disallow meals served between February 4th and February 6th.
- Check the box next to each age group to disallow.
- Check the box next to each meal to disallow. Each meal you check in the Starting Date category is disallowed from the start date to the end date. Each meal you check in the Ending Date category is disallowed on the end date only.
- Click the Disallow Reason drop-down menu and select the reason these meals are disallowed. You must have previously set up review disallow reasons to populate this menu. For more information, see Review Disallow Reasons.
- Check the box next to any of the following that apply:
- 5 Day Attendance Problem
- Closed
- Corrective Action Visit
- Corrective Action Started
- Click the Corrective Action Notes box and enter any notes about corrective action you are taking with the center.
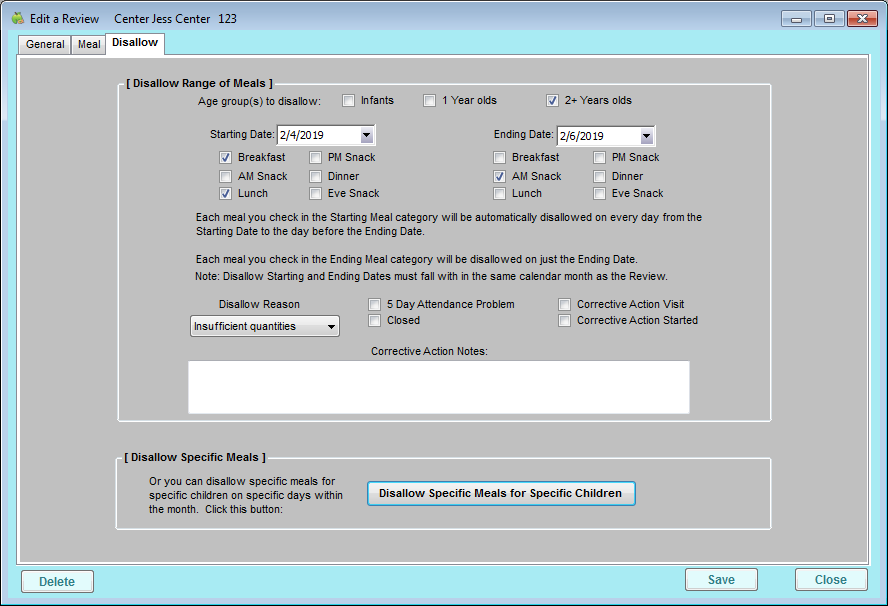
- Disallow specific meals for specific children:
- Click Disallow Specific Meals for Specific Children at the bottom of the tab. The Manually Disallow Meals window opens.
- Click Add Disallow.
- Double-click the date to disallow on the calendar. The Disallow Meals dialog box opens.
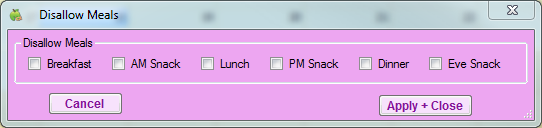
- Check the box next to each meal to disallow for the selected date.
- Click Apply + Close.
- In the Children Affected section, check the box next to each age group to which this applies. To select specific children, check the Specific Children box. Then click Select Children and select the children.
- Click the Disallow Reason drop-down menu and select the disallow reason.
- Click Save.

- Click Close.
- Disallow a range of meals:
- Click Save.
[VIDEO] Enter Site Visit Reviews

 next to each meal component and record the foods that were served for each age group. CX can cross-check the foods the monitor enters with the foods the center recorded (subject to Policy R.3).


Can't find an answer?
Submit a ticket here and our staff will get back to you shortly.
Support Hours:
M-F 9AM - 5PM CT