Note: We have complied a list of CACFP resources for food buying and crediting in the CACP. Click here for more information.
To add a new food:
- Click the Administration menu and select Manage Foods. KidKare opens in a browser.Note: You must have the Manage Foods permission enabled on your account to access the Food Tool. For more information, see Set Staff Permissions.
- Log in using the same credentials you use to access Minute Menu CX.
- From the menu to the left, click Foods.
- Click Food List. The Food List page opens.
- Click New Food.
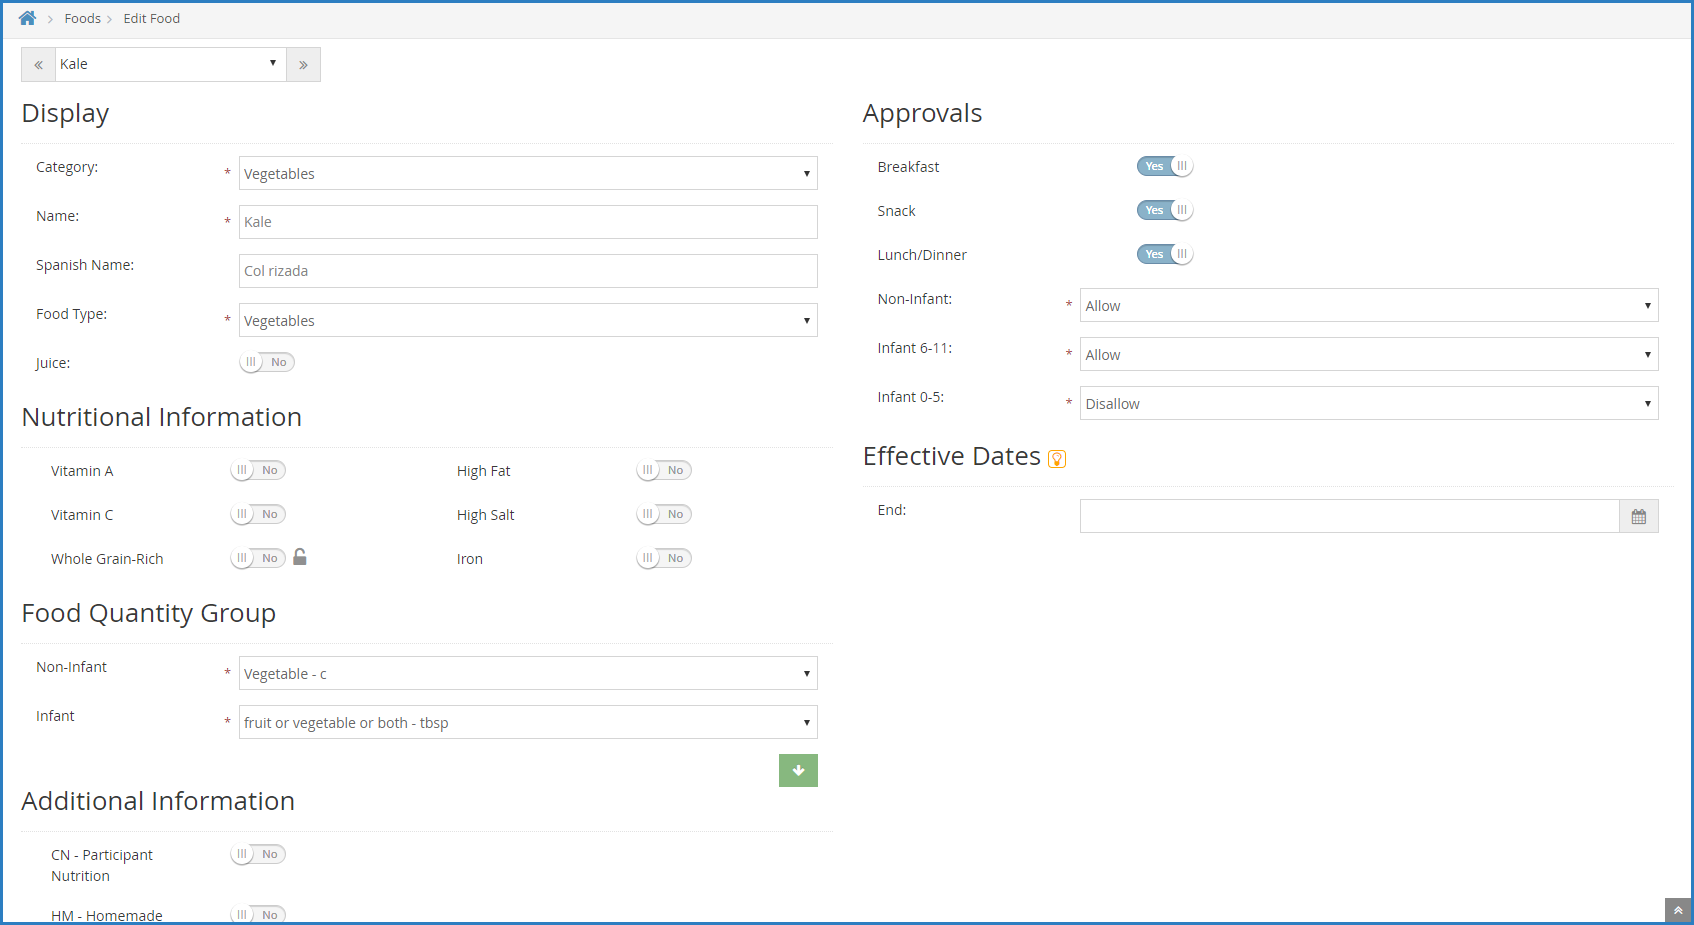
- In the Display section:
- Click the Category drop-down menu and select the category in which to list this food.
- Click the Name box and enter a name for this food.
- Click the Spanish Name box and enter the Spanish name for this food (optional).
- Click the Food Type drop-down menu and select the type of food this is.
- If you select Vegetables or Fruit in Step 6.d, the Juice slider displays. If this is a fruit or vegetable juice, click
 to set it to Yes.
- In the Nutritional Information section, click
 next to each nutritional marker that applies to this food:
- Vitamin A
- Vitamin C
- Whole Grain-RichNote: If you set Whole Grain-Rich to Yes, the food defaults to whole grain-rich when centers add the food to their menus.
- HighFat
- High Salt
- Iron
- In the Food Quantity Group section:
- If you are entering a Bread/Alt or Infant Cereal:
- Click the Grains Group drop-down menu and select the Exhibit A grains group to which this item belongs. You can view Exhibit A here. Note that if you are updating an Infant Cereal, this drop-down menu is locked to Group I (ready-to-eat cereals).
- Click the Serving Size box and enter the standard serving size for this item. For example, if you are updating Brand B bread and the nutrition label says that one serving is one slice, you would type 1 in this box.
- Click the corresponding drop-down menu and select the serving unit. Following our example, you would select slice. You can also click
 and enter a custom unit.
 - Click the Serving Weight box and enter the serving weight from the nutrition label in grams or ounces. Then, click the corresponding drop-down menu and select grams (g) or ounces (oz). In our example, a serving of Bread A weighs 45g, so we enter 45 and select grams (g). Once you enter this information, the 1 Serving = box displays and shows the amount of ounce equivalents in one serving of this item.
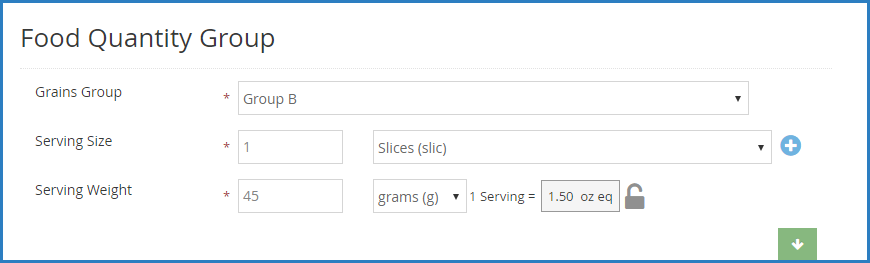
- Click
 to lock this calculation and prevent sites from overriding it on the Daily Menu page in KidKare and the Record Menu window in CX, if needed. Click
  to unlock it again.
- If you are entering any other component: Click each drop-down menu and specify how the food should be measured for Non-Infants and Infants. You can also click
 to view measurements by age group. Your selection in this box affects the unit of measure used on the Menu Production Record when calculating the quantities needed. For more information about the Menu Production Record, see Menu Production Record.
- If you are entering a Bread/Alt or Infant Cereal:
- In the Approvals section:
- Click
 next to each meal for which this food is approved.
 - Click the Non-Infant, Infant 6-11, and Infant 0-5 drop-down menus and select Allow, Disallow, or Warn.
- Click
- In the Effective Dates section:
- If this food is only approved starting on a specific date, click the Start box and enter a start date for the food. If you want this food to be available immediately, do not add a start date.
- If this food is only approved for a limited time, click the End box and enter an end date for the food. If you enter a date in this box, the food will not be available once the end date is reached.
- Click Save.
 to set it to Yes.
 next to each nutritional marker that applies to this food:
 to lock this calculation and prevent sites from overriding it on the Daily Menu page in KidKare and the Record Menu window in CX, if needed. Click
  to unlock it again.
 to view measurements by age group. Your selection in this box affects the unit of measure used on the Menu Production Record when calculating the quantities needed. For more information about the Menu Production Record, see
  next to each meal for which this food is approved.