Once a Monitor is ready to review a center, they can log in to KidKare on any device and complete the review.
Completing the Review Questionnaire in KidKare
- Log in to app.kidkare.com. Use the same credentials you use to access Minute Menu CX.
- From the menu to the left, click Reviews.
- Click Review Centers. The Review Centers page opens.
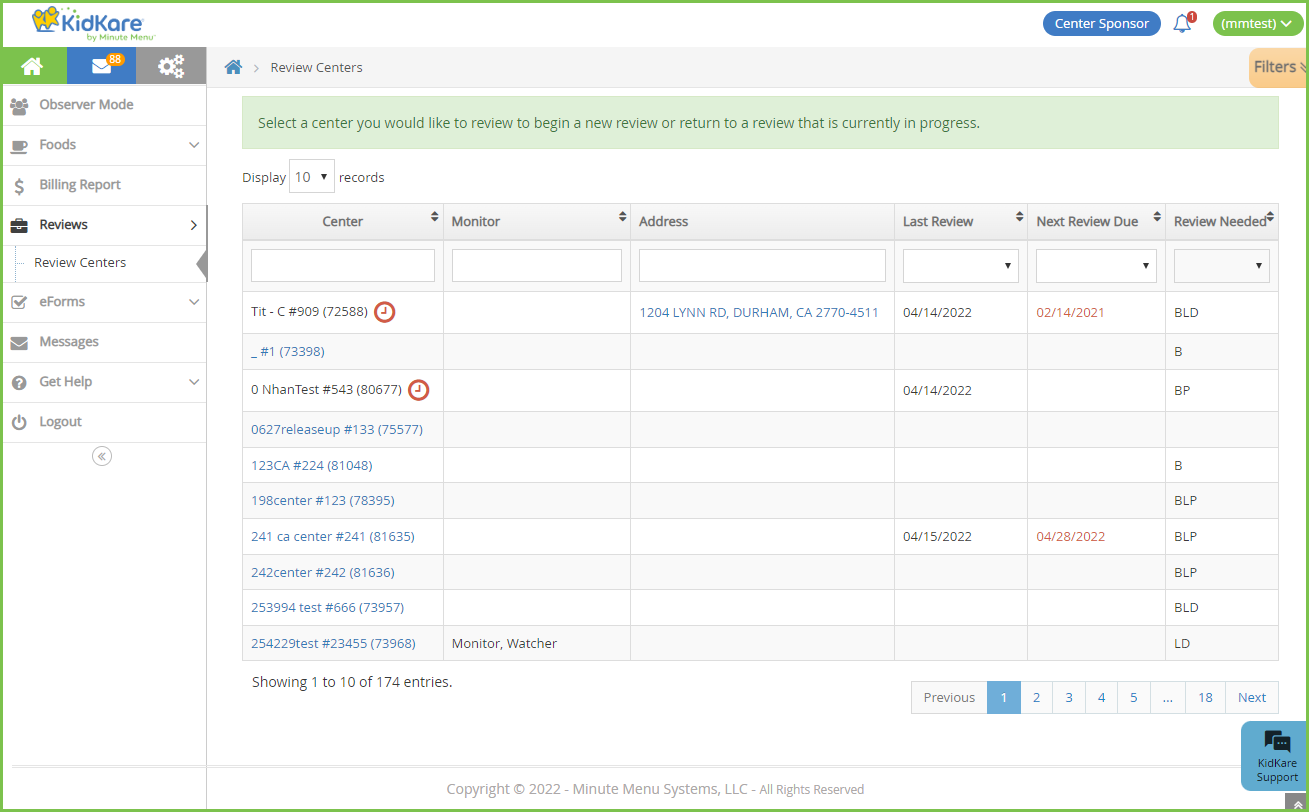
- Locate the center to review.
- Click the Center, Monitor (if available), Last Review, and Next Review Date columns to sort information in ascending or descending order.
- Click the blank boxes at the top of each column to filter information in that column. For example, you can click the Center box and begin typing a center's name.
- Click Filters in the top-right corner to set additional filters. You can filter by Pending, Active, or Inactive status. If available, you can also specify whether to show reviews for all monitors.
- Click the center's address in the Address column to open Google Maps™ in a new window.
- When you are ready to begin the review, click the name of the center to review. The Review Questionnaire opens.
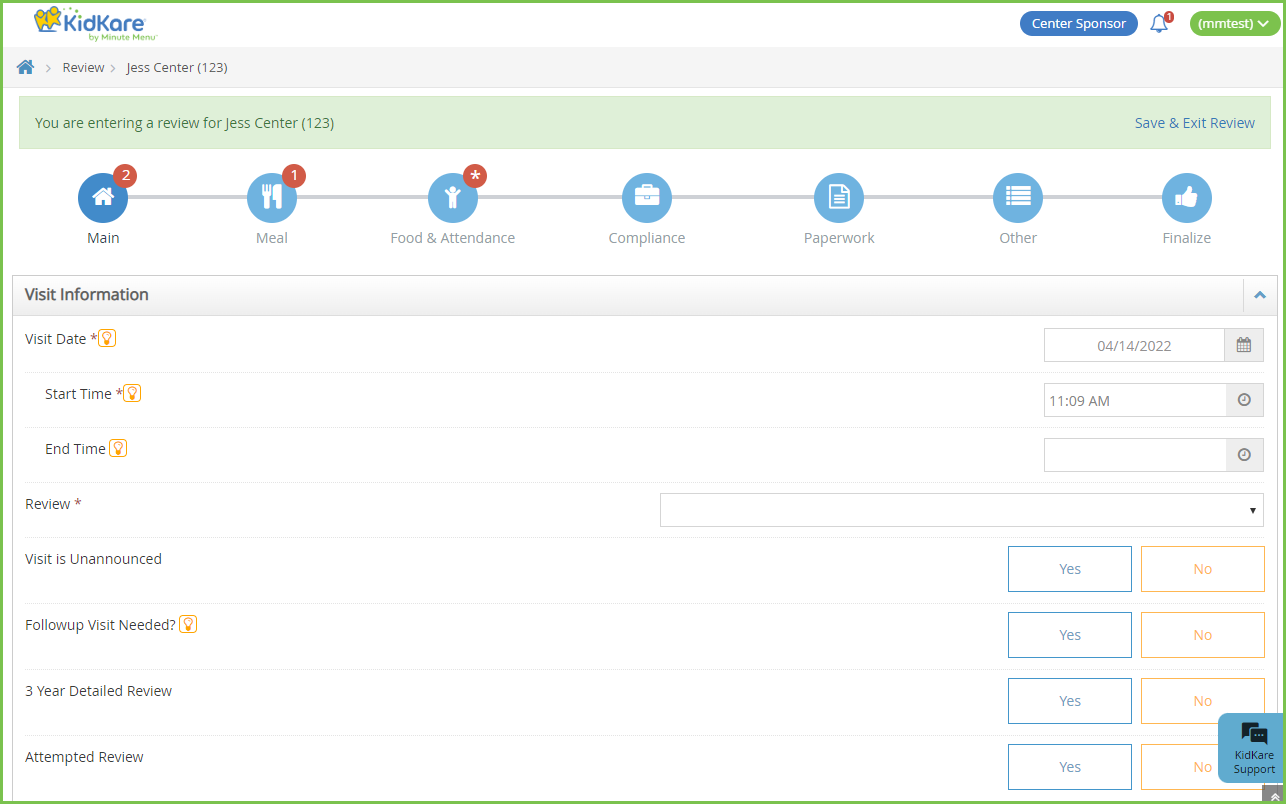 The questionnaire is split into the following pages:
- Main
- Meal
- Food & Attendance
- Service Analysis (Texas Only)
- Compliance
- Paperwork
- Other
- Finalize
- Complete the questions for each page. As each review is created by the sponsor administrator, review questions vary.
- Click Save to save your progress before you continue.
- Click Continue to go to the next page.
- Click a page icon to jump to that particular page.
- Click
 to view more information about the question (if the administrator provided it). When finished, click Close.
- The remaining number of required fields displays next to each page icon and updates automatically as you enter information. The only exception is the Food & Attendance page: An asterisk displays for this page if there are missing fields.

- If you need to exit the review and return later, click Save & Exit Review at the top of the page, or click Save at the bottom of the page and close the review. Your information is retained, and you can return to the review at a later time.
- Once you reach the Finalize page, ensure that all review components are complete. If you are missing required fields:
- The All Required Fields Must Be Completed Before The Review Can Be Signed and Submitted message displays. Links to the incomplete pages are also included. Click the link to jump to the page you need to complete.

- The number of missing fields is indicated next to the page icon (except for the Food & Attendance page, which is marked with an asterisk).

- The All Required Fields Must Be Completed Before The Review Can Be Signed and Submitted message displays. Links to the incomplete pages are also included. Click the link to jump to the page you need to complete.
- Click the Notes box and enter any review notes. Click
 to collapse this section. Click
 to expand it again.
 - In the Signatures section:
- If this is not a desk review, have the center representative sign the Center Signature box.
- If this is a desk review and you want to require an electronic signature, set If this is a desk review, do you want to require an electronic signature? to Yes. The provider will receive an email and a KidKare message prompting them to acknowledge and sign for their review electronically. For more information, see Require Signatures for Desk Reviews.
- Sign the Monitor Signature box.
- Click Complete. The Confirmation page opens. Once you complete the review, the center receives an email and a message in KidKare alerting them that their review report is ready. They can download a copy of their review at the link in either one of these messages.

 The questionnaire is split into the following pages:


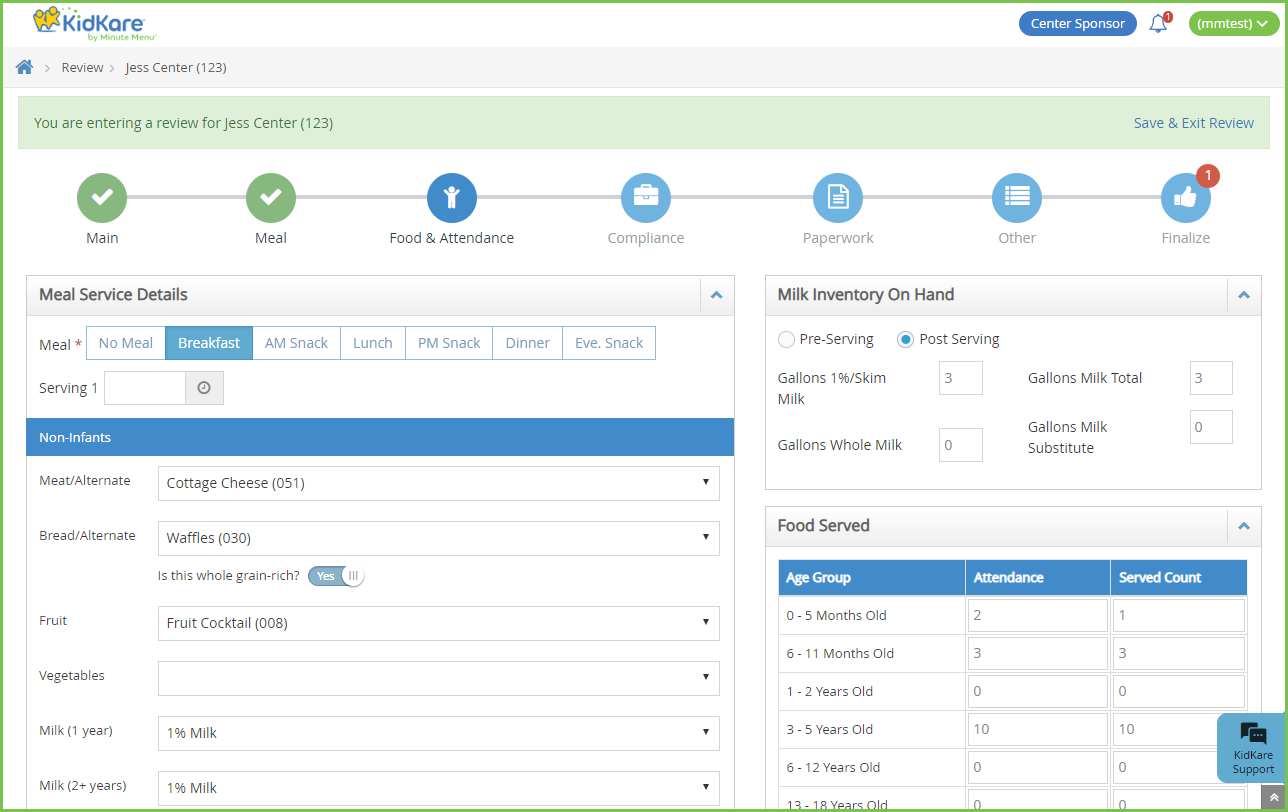
About the Food & Attendance Review Page
The amount of required fields on the Food & Attendance page varies depending on user input. For example, if you do not select a meal, meal components are not required. However, if you do select a meal, the components are required. For this reason, the remaining required fields are marked with an asterisk next to the page icon, and the page display changes as monitors complete the review.
- In the Meal Service Details section:
- Select No Meal, Breakfast, AM Snack, Lunch, or PM Snack.
- If the center is approved for multiple servings, select the number of servings given at the meal (1 or 2). Then, select the time at which each serving was given.
- Select the meal components served in the Non-Infants and Infants section.
- In the Milk Inventory On Hand section:
- Select Pre-Serving to record milk amounts before the meal was served, or select Post Serving to record milk amounts after the meal was served.
- Enter the gallons of milk for each listed milk type.
- In the Food Served, section, click the Attendance and Served Count boxes for each age group and enter the amount of participants who attended the meal and the amount of participants who were served a meal. KidKare totals these counts for you.
- When finished, click Continue.

Service Analysis for Texas Sponsors
Sponsors for the state of Texas must also complete the Service Analysis page. This page lists the food components entered on the Food & Attendance page for non-infants and infants, as well as the required quantities. You must enter the prepared quantities and indicate whether those quantities were sufficient.
- Begin the review as you normally would. For more information, refer back to the heading Completing the Questionnaire in KidKare, above.
- Enter information, as required, and click Continue to move through the review pages.
- When the Service Analysis page opens:
- Click the Category drop-down menu next to each listed food (if available), and select the category to which the food belongs.
- Click the boxes in the Prepared column for each age group, and enter the quantity of food prepared.
- In the Amount Sufficient column, click Yes or No.
- Repeat Step 3 for each meal. You must complete these tables for both non-infants and infants.
- When finished, click Continue.