This article provides more detailed information about the Manage Child Information window. Each number on the images corresponds to a description below.
Child Tab
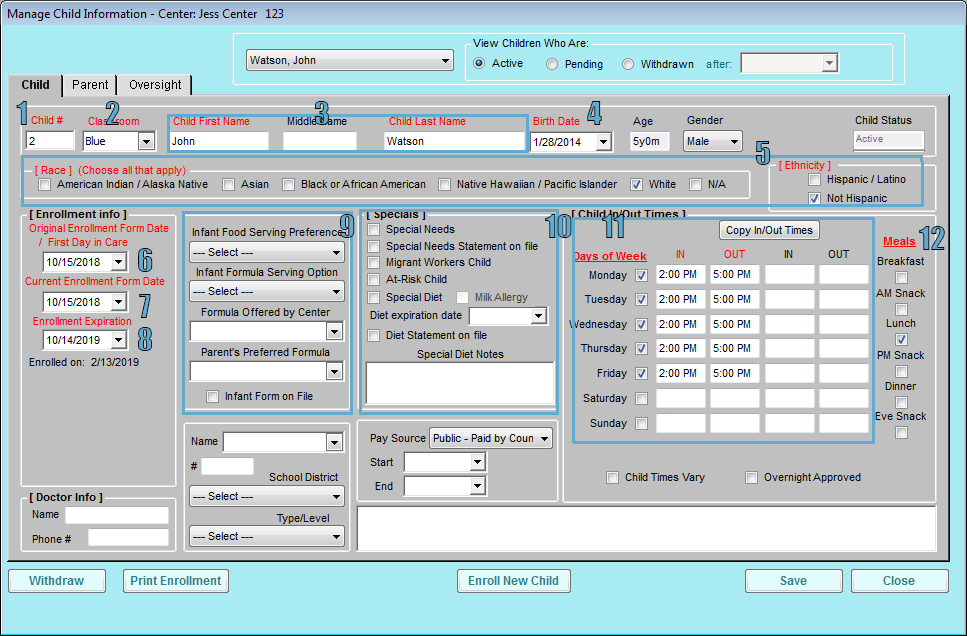
- The Child # box displays the child number. Each child must be assigned a number. You can enter up to four characters in this box.
- The Classroom box displays the classroom to which the child is assigned. Click the drop-down menu and select a classroom, or enter a new classroom.
- The Child First Name, Middle Name, and Child Last Name boxes display the child's name. The Child First Name and Child Last Name boxes are required.
- The Birth Date box displays the child's birthday. You can either type the birthday in this box, or you can click the drop-down menu to select the date from a calendar.
- Check the box next to the child's race and ethnicity. These designations are required by the CACFP.
- The Original Enrollment Form Date/First Day in Care box displays the child's original enrollment date. This box is required. Children claimed before this date will be disallowed. You should only enter this date once, and it should never change.
- The Current Enrollment Form Date box is updated annually as you receive enrollment forms for the new program year are received. Children claimed before this date may be disallowed (subject to policy D.20).
- The Enrollment Expiration Date box is updated annually as you receive enrollment forms. Children claimed after this date may be disallowed (subject to policy D.1).
- This section is for infants only.
- Select an infant food and formula preference: Center Supplies Food or Parent Supplies Food and Refuses. If the child's parent supplies food for this infant, the center's food will automatically be disallowed from the claim.
- Select the formula offered by the center and the parent's preferred formula. The formula selection is populated by formulas you set up in the Manage Formula Types dialog box. To access this dialog box, click the Tools menu and select Manage Formula Types.
- If your agency requires a separate infant feeding form, check the Infant Form on File box when the form is received. Centers do not have access to this options. Centers will be alerted to all infants who do not have a form on file on the center dashboard (subject to policy D.24).
- This section contains options for special needs situations.
- Check the Special Needs box to mark this child as having special needs. Special needs refers to children who are approved to be claimed from age 13-18. Check the Special Needs Statement on File box to indicate that you have received a statement (subject to policy D.7).
- Check the Migrant Workers Child to indicate this child is the child of a migrant worker. Migrant workers' children can be claimed at age 15 and younger.
- Check the At-Risk Child box for each child who participates in the At-Risk program.
- Check the Special Diet box if the child requires special food or has food allergy.
- Check the Milk Allergy box if the child does not drink the milk provided by their age group (whole milk for age 1 and 1% or skim for ages 2 and up). This box automatically includes children in the Substitute Milk section of the Milk Audit. This box is not available if you do not check the Special Diet box.
- Click the Diet Expiration Date box and enter the date on which the child's special diet statement expires. This box is subject to policy D.6.
- Check the Diet Statement on File box when you receive the diet statement. Special diet children who are served and do not have a statement on file may receive an error during claims processing (subject to policy D.5).
- Check the box next to each day of the week the child is present at the center. Then, enter the child's typical in and out times. You can click Copy In/Out Times to copy times from the first boxes to all other selected days of the week.
- Check the box under each meal for which the child is typically present.
Parent Tab
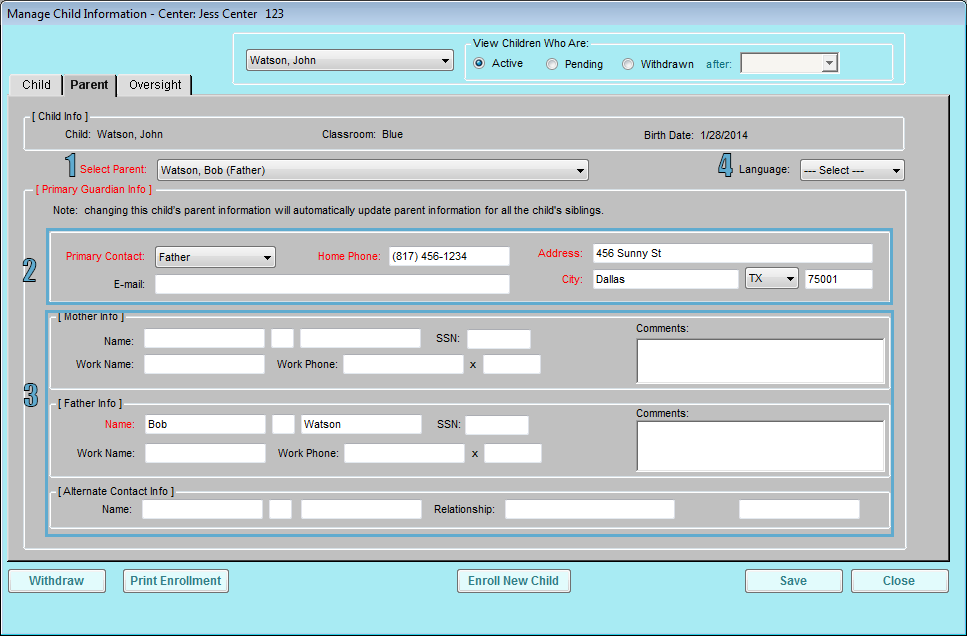

- Click the Select Parent drop-down menu and select an existing parent/guardian record, or select Add New Parent to add a new parent/guardian record. Children with the same parent will be siblings in the program.
- Select the primary contact and enter their home phone, address, and email address.
- Enter the contact's name in the appropriate section, based on their relationship to the child. We recommend you complete all applicable fields.
- Click the Language drop-down menu and select the language in which communication should be sent. You can select English or Spanish.
Oversight Tab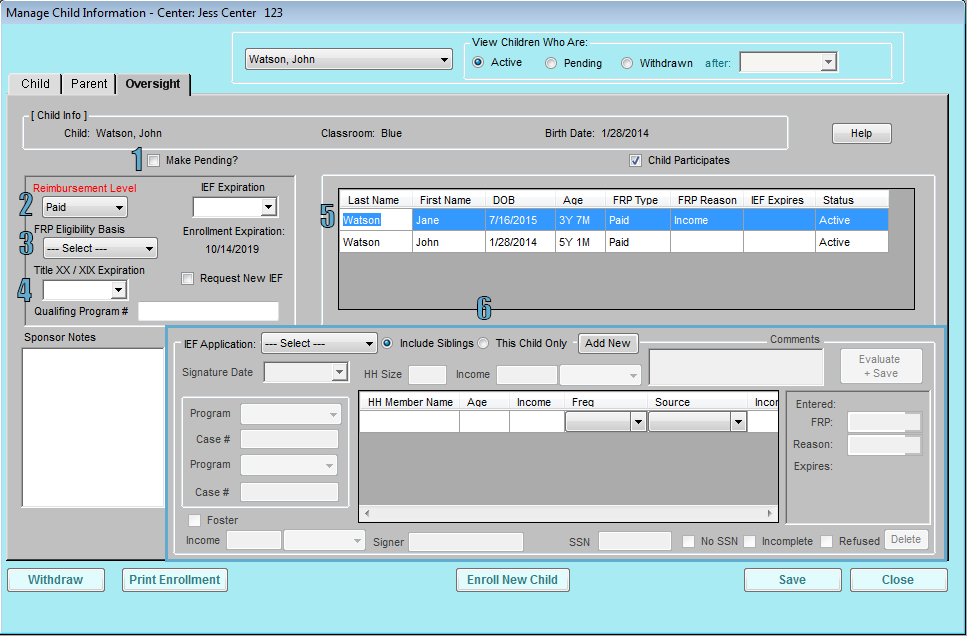

Note: Center accounts typically do not have access to the Oversight tab when enrolling children, as this is where the reimbursement level (free, reduced, or paid) is stored. However, some self-sponsored sites do allow centers access to this page. This is determined by policy F.2.b.
- Check the Make Pending/Make Active box to set an active child to pending or to set a pending child to active.
- Click the Reimbursement Level drop-down menu and select Free, Reduced, or Paid.
- Click the FRP Eligibility Basis drop-down menu and select how the child qualifies for the reimbursement level you selected.
- If the child was categorically eligible through Title XX/XIX, click the Title XX/XIX Expiration box and enter the expiration date for that program. Enter the qualifying program number in the box below the expiration date.
- Siblings are listed here.
- Use the lower half of the window to enter income eligibility information. Minute Menu CX then uses this information to help you calculate the child's reimbursement rate. For more information, see Income Eligibility Calculator.